# 1.3. vue的权限控制实现
# 3.1.菜单的控制
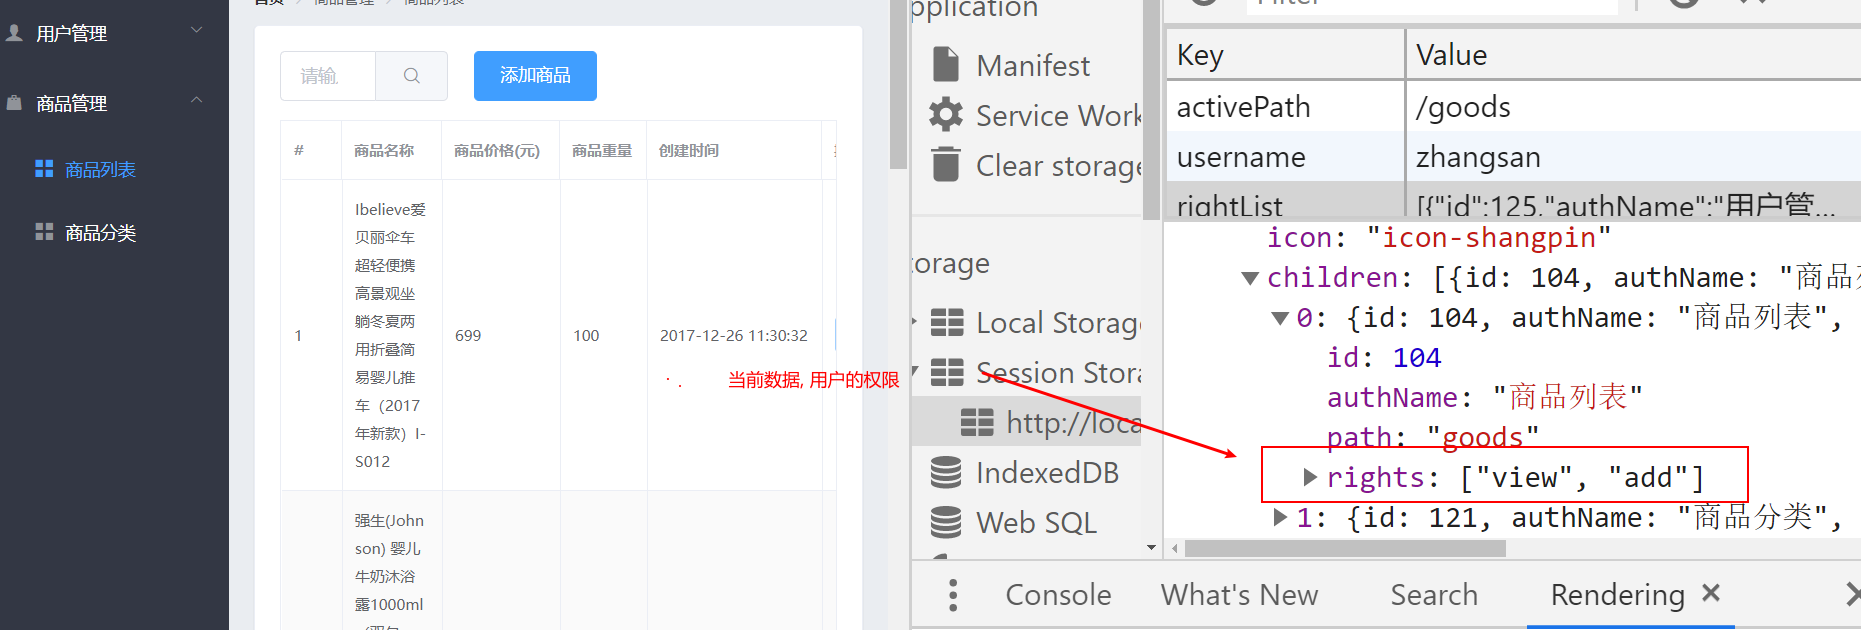
- 查看登陆之后获取到的数据
{
    "data": {
        "id": 500,
        "rid": 0,
        "username": "admin",
        "mobile": "13999999999",
        "email": "123999@qq.com",
        "token": "Bearer eyJhbGciOiJIUzI1NiIsInR5cCI6IkpXVCJ9.eyJ1aWQiOjUwMCwicmlkIjowLCJpYXQiOjE1MTI1NDQyOTksImV4cCI6MTUxMjYzMDY5OX0.eGrsrvwHm-tPsO9r_pxHIQ5i5L1kX9RX444uwnRGaIM"
    },
    "rights": [
        {
            "id": 125,
            "authName": "用户管理",
            "icon": "icon-user",
            "children": [
                {
                    "id": 110,
                    "authName": "用户列表",
                    "path": "users",
                    "rights": [
                        "view",
                        "edit",
                        "add",
                        "delete"
                    ]
                }
            ]
        },
        {
            "id": 103,
            "authName": "角色管理",
            "icon": "icon-tijikongjian",
            "children": [
                {
                    "id": 111,
                    "authName": "角色列表",
                    "path": "roles",
                    "rights": [
                        "view",
                        "edit",
                        "add",
                        "delete"
                    ]
                }
            ]
        },
        {
            "id": 101,
            "authName": "商品管理",
            "icon": "icon-shangpin",
            "children": [
                {
                    "id": 104,
                    "authName": "商品列表",
                    "path": "goods",
                    "rights": [
                        "view",
                        "edit",
                        "add",
                        "delete"
                    ]
                },
                {
                    "id": 121,
                    "authName": "商品分类",
                    "path": "categories",
                    "rights": [
                        "view",
                        "edit",
                        "add",
                        "delete"
                    ]
                }
            ]
        }
    ],
    "meta": {
        "msg": "登录成功",
        "status": 200
    }
}
1
2
3
4
5
6
7
8
9
10
11
12
13
14
15
16
17
18
19
20
21
22
23
24
25
26
27
28
29
30
31
32
33
34
35
36
37
38
39
40
41
42
43
44
45
46
47
48
49
50
51
52
53
54
55
56
57
58
59
60
61
62
63
64
65
66
67
68
69
70
71
72
73
74
75
76
77
78
79
80
81
2
3
4
5
6
7
8
9
10
11
12
13
14
15
16
17
18
19
20
21
22
23
24
25
26
27
28
29
30
31
32
33
34
35
36
37
38
39
40
41
42
43
44
45
46
47
48
49
50
51
52
53
54
55
56
57
58
59
60
61
62
63
64
65
66
67
68
69
70
71
72
73
74
75
76
77
78
79
80
81
在这部分数据中, 除了该用户的基本信息之外, 还有两个字段很关键
- token, 用户前端用户的状态保持
- rights: 该用户具备的权限数据, 一级权限就对应一级菜单, 二级权限就对应二级菜单
根据rights中的数据, 动态渲染左侧菜单栏, 数据在Login.vue得到, 但是在Home.vue才使用, 所以可以把数据用vuex进行维护
- vuex中的代码
export default new Vuex.Store({
  state: {
    rightLists: []
  },
  mutations: {
    setRightLists(state, data) {
      state.rightLists = data
    }
  },
  actions: {
  },
  getters: {
  }
})
1
2
3
4
5
6
7
8
9
10
11
12
13
14
2
3
4
5
6
7
8
9
10
11
12
13
14
- Login中的代码
    login() {
      this.$refs.loginFormRef.validate(async valid => {
        if (!valid) return
        const { data: res } = await this.$http.post('login', this.loginForm)
        if (res.meta.status !== 200) return this.$message.error('登录失败!')
        this.$store.commit('setRightLists', res.rights)
        this.$message.success('登录成功')
        this.$router.push('/home')
      })
    }
1
2
3
4
5
6
7
8
9
10
2
3
4
5
6
7
8
9
10
- Home中的代码
 import { mapState } from 'vuex'

 computed: {
    ...mapState(['rightLists'])
  }
1
2
3
4
5
2
3
4
5
- 此时有一个Bug, 当我们刷新页面, 数据会消失!!!
原因分析:
因为菜单数据是登陆之后才获取到的, 获取菜单数据之后, 就存放在vuex中
一旦刷新页面, vuex中的数据会重新初始化, 所以会变成空的数组
1
2
2
解决方案:
我们可以把数据存储在 sessionStorge中, 并将其和vuex中的数据保持同步
1
代码解决:
export default new Vuex.Store({
  state: {
    rightLists: JSON.parse(sessionStorage.getItem('rightList') || '[]')
  },
  mutations: {
    setRightLists(state, data) {
      state.rightLists = data
      sessionStorage.setItem('rightList', JSON.stringify(data))
    }
  },
  actions: {},
  getters: {}
})
1
2
3
4
5
6
7
8
9
10
11
12
13
2
3
4
5
6
7
8
9
10
11
12
13
- 标识用户名, 方便查看当前用户
- vuex的代码
export default new Vuex.Store({
  state: {
    rightLists: JSON.parse(sessionStorage.getItem('rightList') || '[]'),
    username: sessionStorage.getItem('username')
  },
  mutations: {
    setRightLists(state, data) {
      state.rightLists = data
      sessionStorage.setItem('rightList', JSON.stringify(data))
    },
    setUserName(state, data) {
      state.username = data
      sessionStorage.setItem('username', data)  ⭐⭐⭐
    }
  },
})
1
2
3
4
5
6
7
8
9
10
11
12
13
14
15
16
2
3
4
5
6
7
8
9
10
11
12
13
14
15
16
- Login.vue的代码
    login() {
      this.$refs.loginFormRef.validate(async valid => {
        if (!valid) return
        const { data: res } = await this.$http.post('login', this.loginForm)
        if (res.meta.status !== 200) return this.$message.error('登录失败!')
        console.log(res)
        this.$store.commit('setUserName', res.data.username)   ⭐⭐⭐
        this.$store.commit('setRightLists', res.rights)
        this.$message.success('登录成功')
        this.$router.push('/home')
      })
    }
1
2
3
4
5
6
7
8
9
10
11
12
2
3
4
5
6
7
8
9
10
11
12
- Home.vue的代码
<el-button type="info" @click="logout">{{username}} 退出</el-button>
1
- 退出登陆
    logout() {
      // 删除location中的数据
      sessionStorage.clear()
      this.$router.push('/login')
      // 退出, 删除vuex中的数据
      window.location.reload()
    }
1
2
3
4
5
6
7
2
3
4
5
6
7
# 3.2.界面的控制
1.正常的逻辑是通过登录界面, 登录成功 跳转到管理平台界面, 但是如果用户直接敲入管理平台的地址, 也是可以跳过登录的步骤, 所以应该在某个时机判断用户是否登录
- 如何判断是否登录
sessionStorage,setItem('token', res.data.token)
1
- 什么时机
- 路由导航守卫
router.beforeEach((to, from, next) => {
  if (to.path === '/login') {
    return next()
  }
  const token = sessionStorage.getItem('token')
  if (!token) {
    return next('/login')
  }
  next()
})
1
2
3
4
5
6
7
8
9
10
2
3
4
5
6
7
8
9
10
2.虽然菜单项已经被控制住了, 但是路由信息还是完整的存在于浏览器, 正比如zhangsan这个用户并不具备角色这个菜单, 但是他如果自己在地址栏中敲入/roles的地址, 依然也可以访问角色界面
- 路由导航守卫
- 路由导航守卫固然可以在每次由地址发生变化的时候, 从vuex取出rightList判断用户将要访问的界面, 这个用户到底有没有权限, 不过从另外一个角度来说, 这个用户不具备权限的路由, 是否也应该压根不存在呢?
- 动态路由
- 登录成功之后动态添加
- App.vue中添加
- 代码如下:
- router.js
import Vue from 'vue'
import Router from 'vue-router'
import Login from '@/components/Login.vue'
import Home from '@/components/Home.vue'
import Welcome from '@/components/Welcome.vue'
import Users from '@/components/user/Users.vue'
import Roles from '@/components/role/Roles.vue'
import GoodsCate from '@/components/goods/GoodsCate.vue'
import GoodsList from '@/components/goods/GoodsList.vue'
import NotFound from '@/components/NotFound.vue'
import store from '@/store'   ⭐⭐⭐ // vuex数据

Vue.use(Router)

const userRule = { path: '/users', component: Users }    ⭐⭐⭐
const roleRule = { path: '/roles', component: Roles }
const goodRule = { path: '/goods', component: GoodsList }
const categoryRule = { path: '/categories', component: GoodsCate }

// 路由映射规则            ⭐⭐⭐
const ruleMapping = {
  users: userRule,
  roles: roleRule,
  goods: goodRule,
  categories: categoryRule
}

const router = new Router({
  routes: [
    {
      path: '/',
      redirect: '/home'
    },
    {
      path: '/login',
      component: Login
    },
    {
      path: '/home',
      component: Home,
      redirect: '/welcome',
      children: [
        { path: '/welcome', component: Welcome }   ⭐⭐⭐  // 之前的需要权限的组件进行注释, 需要动态添加
        // { path: '/users', component: Users },
        // { path: '/roles', component: Roles },
        // { path: '/goods', component: GoodsList },
        // { path: '/categories', component: GoodsCate }
      ]
    },
    {
      path: '*',
      component: NotFound
    }
  ]
})

router.beforeEach((to, from, next) => {
  if (to.path === '/login') {
    return next()
  }
  const token = sessionStorage.getItem('token')
  if (!token) {
    return next('/login')
  }
  next()
})

export function initDynamicRoutes() {   ⭐⭐⭐
  // 根据二级权限, 对路由规则进行动态的添加
  // console.log(router)  // 打印当前router对象
  const currentRoutes = router.options.routes
  // currentRoutes[2].children.push()
  const rightLists = store.state.rightLists
  rightLists.forEach(item => {
    item.children.forEach(item => {
      // item 添加二级权限
      const temp = ruleMapping[item.path]
      currentRoutes[2].children.push(temp)
    })
  })

  router.addRoutes(currentRoutes)
}

export default router
1
2
3
4
5
6
7
8
9
10
11
12
13
14
15
16
17
18
19
20
21
22
23
24
25
26
27
28
29
30
31
32
33
34
35
36
37
38
39
40
41
42
43
44
45
46
47
48
49
50
51
52
53
54
55
56
57
58
59
60
61
62
63
64
65
66
67
68
69
70
71
72
73
74
75
76
77
78
79
80
81
82
83
84
85
2
3
4
5
6
7
8
9
10
11
12
13
14
15
16
17
18
19
20
21
22
23
24
25
26
27
28
29
30
31
32
33
34
35
36
37
38
39
40
41
42
43
44
45
46
47
48
49
50
51
52
53
54
55
56
57
58
59
60
61
62
63
64
65
66
67
68
69
70
71
72
73
74
75
76
77
78
79
80
81
82
83
84
85
- login.vue
import { initDynamicRoutes } from '@/router.js'

login() {
      this.$refs.loginFormRef.validate(async valid => {
        if (!valid) return
        const { data: res } = await this.$http.post('login', this.loginForm)
        if (res.meta.status !== 200) return this.$message.error('登录失败!')
        console.log(res)
        this.$store.commit('setUserName', res.data.username)
        this.$store.commit('setRightLists', res.rights)
        sessionStorage.setItem('token', res.data.token)
        this.$message.success('登录成功')

        // 登录成功后, 根据用户所具备的权限, 动态添加路由规则
        initDynamicRoutes()   ⭐⭐⭐
        this.$router.push('/home')
      })
    }
1
2
3
4
5
6
7
8
9
10
11
12
13
14
15
16
17
18
2
3
4
5
6
7
8
9
10
11
12
13
14
15
16
17
18
- 如果我们进行页面刷新, 之前的动态路由会被销毁, 我们需要在根组件调用
- App.vue
import { initDynamicRoutes } from '@/router.js'
export default {
  name: 'app',
  created() {
    initDynamicRoutes()
  }
}
1
2
3
4
5
6
7
2
3
4
5
6
7
# 3.3.按钮的控制
按钮控制
虽然用户可以看到某些界面了, 但是这个界面的一些按钮, 该用户可能是没有权限(比如只有可读, 没有编辑, 删除), 因此, 我们需要对组件中的一些按钮进行控制, 用户不具备权限的按钮就隐藏或者禁用, 而在这块中, 可以把该逻辑放在自定义指令中
- permission.js
import Vue from 'vue'
import router from '@/router.js'
Vue.directive('permission', {
  inserted(el, binding) {
    const { action, effect } = binding.value
    // 判断, 当前的路由所对应的组件中, 如何判断用户是否具备action的权限
    // console.log(router.currentRoute.meta)   表示当前路由规则的权限数据
    if (router.currentRoute.meta.indexOf(action) === -1) {
      // 不具备权限
      if (effect === 'disabled') {
        // 要么禁用按钮
        el.disabled = true
        el.classList.add('is-disabled') // element需要添加禁用的样式
      } else {
        // 要么移除按钮, 不显示
        el.parentNode.removeChild(el)
      }
    }
  }
})
1
2
3
4
5
6
7
8
9
10
11
12
13
14
15
16
17
18
19
20
2
3
4
5
6
7
8
9
10
11
12
13
14
15
16
17
18
19
20
- 自定义指令需要在 main.js引入
import './utils/permission.js'
1
- 需要在router.js添加元数据
export function initDynamicRoutes() {
  // 根据二级权限, 对路由规则进行动态的添加
  // console.log(router)  // 打印当前router对象
  const currentRoutes = router.options.routes
  // currentRoutes[2].children.push()
  const rightLists = store.state.rightLists
  rightLists.forEach(item => {
    item.children.forEach(item => {
      // item 添加二级权限
      const temp = ruleMapping[item.path]
      // 添加meta元数据
      temp.meta = item.rights   ⭐⭐⭐   // 添加当前路由规则的权限数据
      currentRoutes[2].children.push(temp)
    })
  })
  router.addRoutes(currentRoutes)
}
1
2
3
4
5
6
7
8
9
10
11
12
13
14
15
16
17
2
3
4
5
6
7
8
9
10
11
12
13
14
15
16
17
- 在组件中使用, 比如 user.vue
 <el-button
      size="mini"
      type="primary"
      v-permission="{action:'edit', effect:'disabled'}"
      icon="el-icon-edit">
      编辑
</el-button>

v-permission="{ action: 'edit'}"                      // 移除按钮, 隐藏
v-permission="{ action: 'edit', effect: 'disabled' }" // 禁用按钮
1
2
3
4
5
6
7
8
9
10
2
3
4
5
6
7
8
9
10
# 3.4.请求和响应的控制
请求控制
- 除了登录请求都得要带上token, 这样服务器才可以鉴别你的身份
axios.interceptors.request.use(req => {
  if (req.url !== 'login') {
    // 不是登录的请求, 我们应该在请求头中 加入token数据
    req.headers.Authorization = sessionStorage.getItem('token')
  }
  return req
})
1
2
3
4
5
6
7
2
3
4
5
6
7
- 如果发出了非权限内的请求, 应该直接在前端范围内阻止, 虽然这个请求发到服务器也会被拒绝
import axios from 'axios'
import Vue from 'vue'
import router from '@/router.js'
// 配置请求的跟路径, 目前用mock模拟数据, 所以暂时把这一项注释起来
// axios.defaults.baseURL = 'http://127.0.0.1:8888/api/private/v1/'
// resful请求方式与权限对应规则   ⭐⭐⭐
const actionMapping = {
  get: 'view',
  post: 'add',
  put: 'edit',
  delete: 'delete'
}
axios.interceptors.request.use(req => {
  if (req.url !== 'login') {
    // 不是登录的请求, 我们应该在请求头中 加入token数据
    req.headers.Authorization = sessionStorage.getItem('token')
    const action = actionMapping[req.method]     ⭐⭐⭐
    const currentRight = router.currentRoute.meta
    if (currentRight && currentRight.indexOf(action) === -1) {
      alert('没有权限')
      return Promise.reject(new Error('没有权限了'))
    }
  }
  return req
})
Vue.prototype.$http = axios
1
2
3
4
5
6
7
8
9
10
11
12
13
14
15
16
17
18
19
20
21
22
23
24
25
26
2
3
4
5
6
7
8
9
10
11
12
13
14
15
16
17
18
19
20
21
22
23
24
25
26
响应控制
- 得到了服务器返回的状态码401, 代表token超时或者被篡改 , 此时应该强制跳转到登录界面
axios.interceptors.response.use(res => {
  if (res.data.meta.status === 401) {
    router.push('/login')
    sessionStorage.clear()
    window.location.reload()
  }
  return res
})
1
2
3
4
5
6
7
8
2
3
4
5
6
7
8
← 1.2. 前端权限控制思路 1.4. 小结 →