# 三.qiankun实战
实现了css样式隔离
实现了js隔离
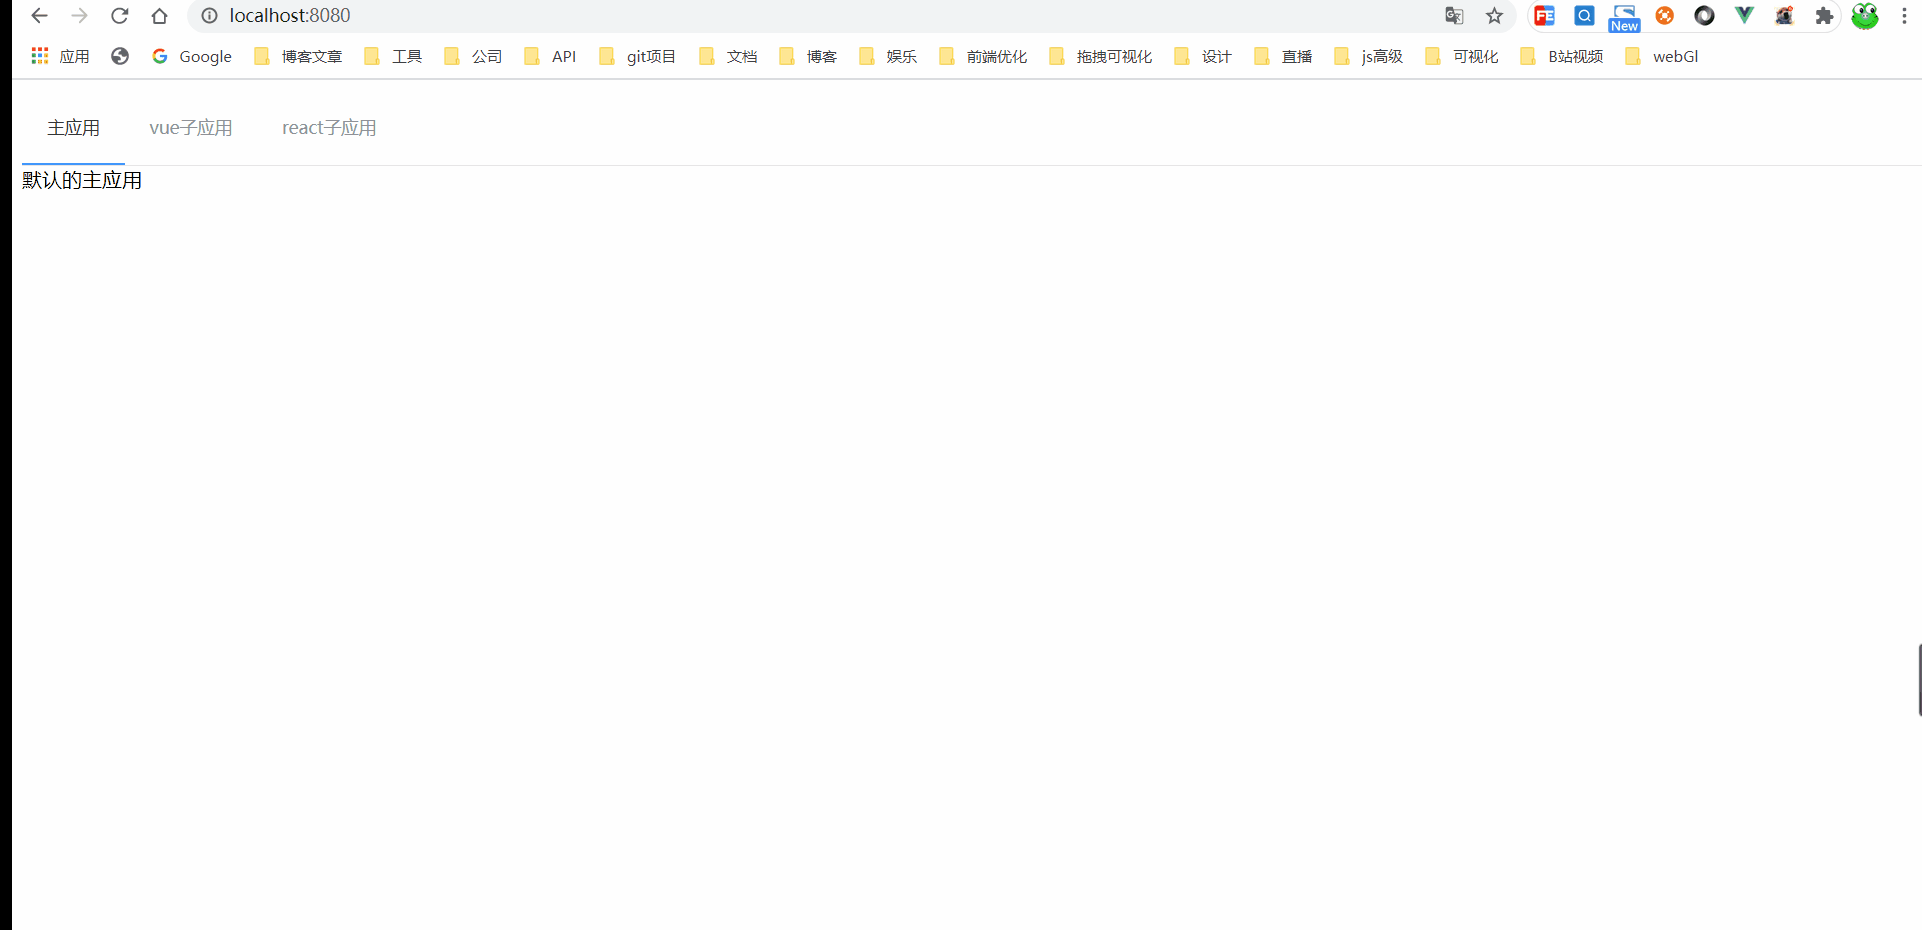
# 话不多说, 先上效果图
# 创建项目
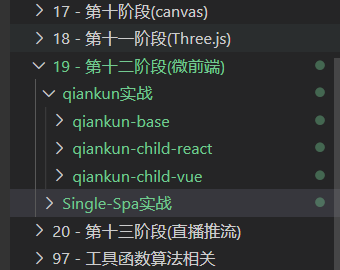
创建三个项目(一个主应用和两个子应用)
1.创建一个主应用 (Vue技术栈)
vue create qiankun-base
1
2.创建一个子应用 (Vue技术栈)
vue create qiankun-child-vue
1
3.创建一个子应用 (React技术栈)
npx create-react-app qiankun-child-react
1
项目目录如下
# 安装
主应用安装qiankun, 子应用无需安装, 暴露协议即可
npm i qiankun -S 或者 yarn add qiankun
1
# 1).主应用界面编写
APP.vue界面改造
<template>
    <div>
        <el-menu class="el-menu-demo"
                 :router="true"
                 mode="horizontal">
            <!-- 基座中可以放自己的路由 -->
            <el-menu-item index="/">主应用</el-menu-item>

            <!-- 引用其他子应用 -->
            <el-menu-item index="/vue">vue子应用</el-menu-item>
            <el-menu-item index="/react">react子应用</el-menu-item>
        </el-menu>

        <router-view></router-view>

        <div id="vue"></div>
        <div id="react"></div>
    </div>
</template>
1
2
3
4
5
6
7
8
9
10
11
12
13
14
15
16
17
18
19
20
2
3
4
5
6
7
8
9
10
11
12
13
14
15
16
17
18
19
20
# 2).主应用配置
main.js文件改造
import Vue from 'vue'
import App from './App.vue'
import ElementUI from 'element-ui';
import 'element-ui/lib/theme-chalk/index.css';
import router from './router'

Vue.use(ElementUI);

// 1.引用qiankun中的两个API
import {registerMicroApps, start } from 'qiankun'

// 2.配置子应用
const apps = [{
        name: 'vueApp', // 应用名称
        // 子应用入口
        // 默认会加载这个html, 解析里面的js 动态的执行
        // (子应用必须支持跨域) fetch
        entry: '//localhost:5050',
        container: '#vue', // 容器名
        activeRule: '/vue', // 激活的路径
        props: {
            // 传递给子应用的数据
            data: '星城哈哈'
        }
    },
    {
        name: 'reactApp',
        entry: '//localhost:6060',
        container: '#react',
        activeRule: '/react'
    }
]

// 3.注册应用
registerMicroApps(apps, {
    // 加载应用之前的钩子
    beforeLoad: app => console.log('before load', app.name),
    beforeMount: [
        app => console.log('before mount', app.name),
    ]
})

// 4.开启应用
start({
    // 是否开启预加载,默认为 true。
    prefetch: false,
    // 是否开启沙箱,默认为 true
    sandbox: true,
    // 是否为单实例场景,单实例指的是同一时间只会渲染一个微应用。默认为 true
    singular: true
})

Vue.config.productionTip = false

new Vue({
    router,
    render: h => h(App)
}).$mount('#app')
1
2
3
4
5
6
7
8
9
10
11
12
13
14
15
16
17
18
19
20
21
22
23
24
25
26
27
28
29
30
31
32
33
34
35
36
37
38
39
40
41
42
43
44
45
46
47
48
49
50
51
52
53
54
55
56
57
58
2
3
4
5
6
7
8
9
10
11
12
13
14
15
16
17
18
19
20
21
22
23
24
25
26
27
28
29
30
31
32
33
34
35
36
37
38
39
40
41
42
43
44
45
46
47
48
49
50
51
52
53
54
55
56
57
58
# 3).子Vue应用
main.js文件改造
import Vue from 'vue'
import App from './App.vue'
import router from './router'

Vue.config.productionTip = false

let instance = null

function render(props) {
    instance = new Vue({
        router,
        render: h => h(App)
    }).$mount('#app') // 这里是挂载到自己的html中, 基座会拿到这个挂载后的html, 将其插入进去
}

// 如果被父应用引入时, 会动态设置publicPath //localhost:5050
if (window.__POWERED_BY_QIANKUN__) {
    __webpack_public_path__ = window.__INJECTED_PUBLIC_PATH_BY_QIANKUN__;
}
// 如果没有被父应用引入时, 可以独立运行子应用
if (!window.__POWERED_BY_QIANKUN__) {
    render()
}

// 暴露子应用的协议就ok了
export async function bootstrap(props) {
}
export async function mount(props) {
    console.log(props)  // {data:'星城哈哈'}
    render(props)
}
export async function unmount(props) {
    instance.$destroy()
}
1
2
3
4
5
6
7
8
9
10
11
12
13
14
15
16
17
18
19
20
21
22
23
24
25
26
27
28
29
30
31
32
33
34
2
3
4
5
6
7
8
9
10
11
12
13
14
15
16
17
18
19
20
21
22
23
24
25
26
27
28
29
30
31
32
33
34
vue.config.js配置
module.exports = {
    lintOnSave:false,
    // 允许跨域
    devServer: {
        port: 5050,
        headers: {
            'Access-Control-Allow-Origin': '*'
        }
    },
    // 配置库打包
    configureWebpack: {
        output: {
            library: 'vueApp',
            libraryTarget: 'umd'
        }
    }
}
1
2
3
4
5
6
7
8
9
10
11
12
13
14
15
16
17
2
3
4
5
6
7
8
9
10
11
12
13
14
15
16
17
# 4).子React应用
改造index.js文件
import React from 'react';
import ReactDOM from 'react-dom';
import './index.css';
import App from './App';

function render() {
    ReactDOM.render(
      <React.StrictMode>
        <App />
      </React.StrictMode>,
      document.getElementById('root')
    );
}

// 独立运行子应用
if(!window.__POWERED_BY_QIANKUN__){
    render()
  }

// 暴露子应用的协议就ok了
export async function bootstrap() {}
export async function mount() {render();}
export async function unmount() {
    ReactDOM.unmountComponentAtNode(document.getElementById("root"));
}
1
2
3
4
5
6
7
8
9
10
11
12
13
14
15
16
17
18
19
20
21
22
23
24
25
2
3
4
5
6
7
8
9
10
11
12
13
14
15
16
17
18
19
20
21
22
23
24
25
重写react中的webpack配置文件 (config-overrides.js)
yarn add react-app-rewired --save-dev
1
修改package.json
  "scripts": {
    "start": "react-app-rewired start",
    "build": "react-app-rewired build",
    "test": "react-app-rewired test",
    "eject": "react-app-rewired eject"
  },
1
2
3
4
5
6
2
3
4
5
6
增加配置文件
增加 config-overrides.js
module.exports = {
    // 修改打包配置
    webpack: (config) => {
      config.output.library = `reactApp`;
      config.output.libraryTarget = "umd";
      config.output.publicPath = 'http://localhost:6060/'
      return config
    },
    // 配置跨域
    devServer: function (configFunction) {
      return function (proxy, allowedHost) {
        const config = configFunction(proxy, allowedHost);
        config.headers = {
          "Access-Control-Allow-Origin": "*",
        };
        return config;
      };
    },
  };
1
2
3
4
5
6
7
8
9
10
11
12
13
14
15
16
17
18
19
2
3
4
5
6
7
8
9
10
11
12
13
14
15
16
17
18
19
配置.env文件
PORT=6060
WDS_SOCKET_PORT=6060
1
2
2
React路由配置
安装路由
yarn add react-router-dom
1
引入路由
import { BrowserRouter, Route, Link } from "react-router-dom"
const BASE_NAME = window.__POWERED_BY_QIANKUN__ ? "/react" : "";
function App() {
  return (
    <BrowserRouter basename={BASE_NAME}>
      <Link to="/">首页</Link>
      <Link to="/about">关于</Link>
      <Route path="/" exact render={() => <h1>hello home</h1>}></Route>
      <Route path="/about" render={() => <h1>hello about</h1>}></Route>
    </BrowserRouter>
  );
}
1
2
3
4
5
6
7
8
9
10
11
12
2
3
4
5
6
7
8
9
10
11
12
# 总结
主应用
- 1.安装qiankun
- 2.在主应用中注册子应用
子应用
- 1.导出相应的3个生命周期钩子
- 2.配置子应用的打包工具