# 3.喜欢简单,选择Mocha
Mocha (opens new window)(发音"摩卡")诞生于2011年,是现在最流行的JavaScript测试框架之一,在浏览器和Node环境都可以使用。所谓"测试框架",就是运行测试的工具。通过它,可以为JavaScript应用添加测试,从而保证代码的质量。
# 安装
全局安装Mocha
npm install -g mocha
项目中也安装Mocha
npm install --save-dev mocha
在package.json中加入下面脚本:
"scripts": {
    "test": "mocha"
}
2
3
Chai 是一个针对 Node.js 和浏览器的行为驱动测试和测试驱动测试的断言库,可与任何 JavaScript 测试框架集成。它是Mocha的好帮手~~
npm install --save-dev chai
在package.json中加入下面脚本:
"scripts": {
    "test": "mocha"
}
2
3
# 关于断言
expect断言的优点是很接近自然语言,下面是一些例子。
// 相等或不相等
expect(4 + 5).to.be.equal(9);
expect(4 + 5).to.be.not.equal(10);
expect(foo).to.be.deep.equal({ bar: 'baz' });

// 布尔值为true
expect('everthing').to.be.ok;
expect(false).to.not.be.ok;

// typeof
expect('test').to.be.a('string');
expect({ foo: 'bar' }).to.be.an('object');
expect(foo).to.be.an.instanceof(Foo);

// include
expect([1,2,3]).to.include(2);
expect('foobar').to.contain('foo');
expect({ foo: 'bar', hello: 'universe' }).to.include.keys('foo');

// empty
expect([]).to.be.empty;
expect('').to.be.empty;
expect({}).to.be.empty;

// match
expect('foobar').to.match(/^foo/);
2
3
4
5
6
7
8
9
10
11
12
13
14
15
16
17
18
19
20
21
22
23
24
25
26
两种使用方式:
// commonjs
const expect = require('chai').expect

// es6
import { expect } from 'chai'
2
3
4
5
# 测试案例
其中index.js为我们的被测试代码:
/**
 * 加法函数
 * @param {第一个数} a
 * @param {第二个数} b
 */
function addNum(a,b){
    return a+b;
}
module.exports=addNum;
2
3
4
5
6
7
8
9
新建测试脚本test/demo.js
const expect = require('chai').expect;
const addNum = require('../src/index')

describe('测试index.js', function() {
  describe('测试addNum函数', function() {
    it('两数相加结果为两个数字的和', function() {
      expect(addNum(1,2)).to.be.equal(3);
      // 以上语法为chai的expect语法,它还有should语法和asset语法。
    });
  });
});


// 等价的意思
var addNum=require('../src/index')

describe('测试index.js', function() {
  describe('测试addNum函数', function() {
    it('两数相加结果为两个数字的和', function() {
       if(addNum(1,2)!==3){
         throw new Error("两数相加结果不为两个数字的和");
       }
    });
  });
});
2
3
4
5
6
7
8
9
10
11
12
13
14
15
16
17
18
19
20
21
22
23
24
25
# Mocha测试命令
如果想测试单一的测试js,可以用:
mocha test/index.test.js
或者多个js
mocha test/index.test.js test/add.test.js
当然也可以用通配符测试某个文件夹下所有的js和jsx:
# node 通配符
mocha 'test/some/*.@(js|jsx)'

# shell 通配符
mocha test/unit/*.js

mocha spec/{my,awesome}.js
2
3
4
5
6
7
# ES6语法支持
在上面我们用的并非是ES6的语法,那么让我们把其中的代码都改为ES6的语法。 其中index.js为:
/**
 * 加法函数
 * @param {第一个数} a
 * @param {第二个数} b
 */
function addNum(a, b) {
  return a + b
}

export {
  addNum
}
2
3
4
5
6
7
8
9
10
11
12
而index.test.js为:
import { expect } from 'chai'
import { addNum } from '../src/index'

describe('测试index.js', function () {
  describe('测试addNum函数', function () {
    it('两个参数相加结果为两个数字的和', function () {
      expect(addNum(1, 2)).to.be.equal(3);
    })
    it('两个参数相加结果不为和以外的数', function () {
      expect(addNum(1, 2)).to.be.not.equal(4);
    })
  })
})
2
3
4
5
6
7
8
9
10
11
12
13
此时直接运行mocha肯定是不行的,我们现需要安装一下babel:
npm install --save-dev @babel/cli @babel/core @babel/node @babel/register @babel/preset-env chai mocha nodemon
然后,在项目目录下面,新建一个.babelrc文件:
{
  "presets": ["@babel/preset-env"]
}
2
3
接着讲package.json中的脚本改为:
"scripts": {
  "test": "mocha --require @babel/register"
},
2
3
命令变得更加简单了
# 更多用法
# 超时
  --timeout, -t, --timeouts  Specify test timeout threshold (in milliseconds)
                                                        [number] [default: 2000]
2
官方默认的超时是2000毫秒,即2s。
有三种方式来修改超时:
--no-timeout参数或者debug模式中,全局禁用了超时;
--timeout后面接时间(毫秒),全局修改了本次执行测试用例的超时时间;
在测试用例里面,使用this.timeout方法:
it('should take less than 500ms', function(done) {
  this.timeout(500);
  setTimeout(done, 300);
});
2
3
4
在钩子方法里面使用:
describe('a suite of tests', function() {
  beforeEach(function(done) {
    this.timeout(3000); // A very long environment setup.
    setTimeout(done, 2500);
  });
});
2
3
4
5
6
同样,可以使用``this.timeout(0)
去禁用超时。
# 钩子方法(生命周期函数)
Mocha在describe块之中,提供测试用例的四个钩子:before()、after()、beforeEach()和afterEach()。它们会在指定时间执行。
describe('测试index.js',()=> {
  before(()=>console.info("在本区块的所有测试用例之前执行"))

  after(()=>console.info("在本区块的所有测试用例之后执行"))

  beforeEach(()=>console.info("在本区块的每个测试用例之前执行"))

  afterEach(()=>console.info("在本区块的每个测试用例之后执行"))

  describe('测试addNum函数', ()=> {
    it('两数相加结果为两个数字的和', ()=> {
      assert.equal(addNum(1,2),3)
    })
  })
})
2
3
4
5
6
7
8
9
10
11
12
13
14
15
# 异步测试
Mocha本身是支持异步测试的。只需要为describe回调函数添加一个done参数, 成功时调用done(),失败时调用done(err)。例如:
var expect = require('chai').expect;
describe('db', function() {
    it('#get', function(done) {
        db.get('foo', function(err, foo){
            if(err) done(err);
            expect(foo).to.equal('bar');
            done();
        });
    });
});
2
3
4
5
6
7
8
9
10
- 如果未调用
done函数,Mocha会一直等待直到超时。 - 如果未添加
done参数,Mocha会直接返回成功,不会捕获到异步的断言失败。例如:
it('#get', function(){
    setTimeout(function(){
        expect(1).to.equal(2);
    }, 100);
});
2
3
4
5
运行上述测试Mocha (opens new window)总会提示Passing。
Mocha怎么知道是否要等待异步断言呢?因为JavaScript中的Function (opens new window)有一个
length属性, 通过它可以获得该函数的形参个数。Mocha通过传入回调的length来判断是否需要等待。
或者,done()您可以返回Promise (opens new window),而不是使用回调。如果您正在测试的API返回promises而不是回调,可以这样进行使用:
beforeEach(function() {
  return db.clear().then(function() {
    return db.save([tobi, loki, jane]);
  });
});

describe('#find()', function() {
  it('respond with matching records', function() {
    return db.find({type: 'User'}).should.eventually.have.length(3);
  });
});
2
3
4
5
6
7
8
9
10
11
同样,可以使用async / await (opens new window),您还可以编写如下的异步测试:
beforeEach(async function() {
  await db.clear();
  await db.save([tobi, loki, jane]);
});

describe('#find()', function() {
  it('responds with matching records', async function() {
    const users = await db.find({type: 'User'});
    users.should.have.length(3);
  });
});
2
3
4
5
6
7
8
9
10
11
需要Babel支持~~~
# 示例项目
# 创建项目&安装依赖
// 初始化一个nodejs项目
npm init -y

// 安装依赖
npm install --save-dev @babel/cli @babel/core @babel/node @babel/register @babel/preset-env chai mocha nodemon
2
3
4
5
形成package.json
{
  "name": "projects",
  "version": "1.0.0",
  "description": "",
  "main": "index.js",
  "scripts": {
  },
  "keywords": [],
  "author": "",
  "license": "ISC",
  "devDependencies": {
    "@babel/cli": "^7.5.0",
    "@babel/core": "^7.5.0",
    "@babel/node": "^7.5.0",
    "@babel/preset-env": "^7.5.0",
    "@babel/register": "^7.4.4",
    "chai": "^4.2.0",
    "mocha": "^6.1.4",
    "nodemon": "^1.19.1"
  }
}
2
3
4
5
6
7
8
9
10
11
12
13
14
15
16
17
18
19
20
21
# 测试过程
新建一个待测试的方法./src/index.js
const sayHello = () => "Hello world!!!"

console.log(sayHello())

// ES6语法
export default sayHello
2
3
4
5
6
测试脚本./test/index.spec.js
import { expect } from "chai"
import sayHello from "../src/index"

describe("index test", () => {
  describe("sayHello function", () => {
    it("should say Hello guys!", () => {

      const str = sayHello();
      expect(str).to.equal("Hello guys!")
    })
  })
})
2
3
4
5
6
7
8
9
10
11
12
package.json中的脚本:
  "scripts": {
    // "start": "nodemon ./src/index.js",  // 针对ES5语法
    "start:babel": "nodemon --exec babel-node ./src/index.js",
    "test:watch": "mocha --require @babel/register --watch",
    "test": "mocha --require @babel/register",
    "build": "babel src --out-dir ./dist --source-maps",
    "serve": "node ./dist/index.js",
    "debug": "node --inspect-brk ./dist/index.js"
  },
2
3
4
5
6
7
8
9
开始测试:npm run test
报错了,因为期望的值与实际值不一致。
Hello world!!!


  index test
    sayHello function
      1) should say Hello guys!


  0 passing (9ms)
  1 failing

  1) index test
       sayHello function
         should say Hello guys!:

      AssertionError: expected 'Hello world!!!' to equal 'Hello guys!'
      + expected - actual

      -Hello world!!!
      +Hello guys!

      at Context.equal (test/index.spec.js:9:22)
2
3
4
5
6
7
8
9
10
11
12
13
14
15
16
17
18
19
20
21
22
修改测试脚本,或者修改index.js文件:
修改./test/index.spec.js
import { expect } from "chai"
import sayHello from "../src/index"

describe("index test", () => {
  describe("sayHello function", () => {
    it("should say Hello world!!!", () => {

      const str = sayHello();
      expect(str).to.equal("Hello world!!!")
    })
  })
})
2
3
4
5
6
7
8
9
10
11
12
再次测试:
> mocha --require @babel/register

Hello world!!!


  index test
    sayHello function
      ✓ should say Hello world!!!


  1 passing (6ms)
2
3
4
5
6
7
8
9
10
11
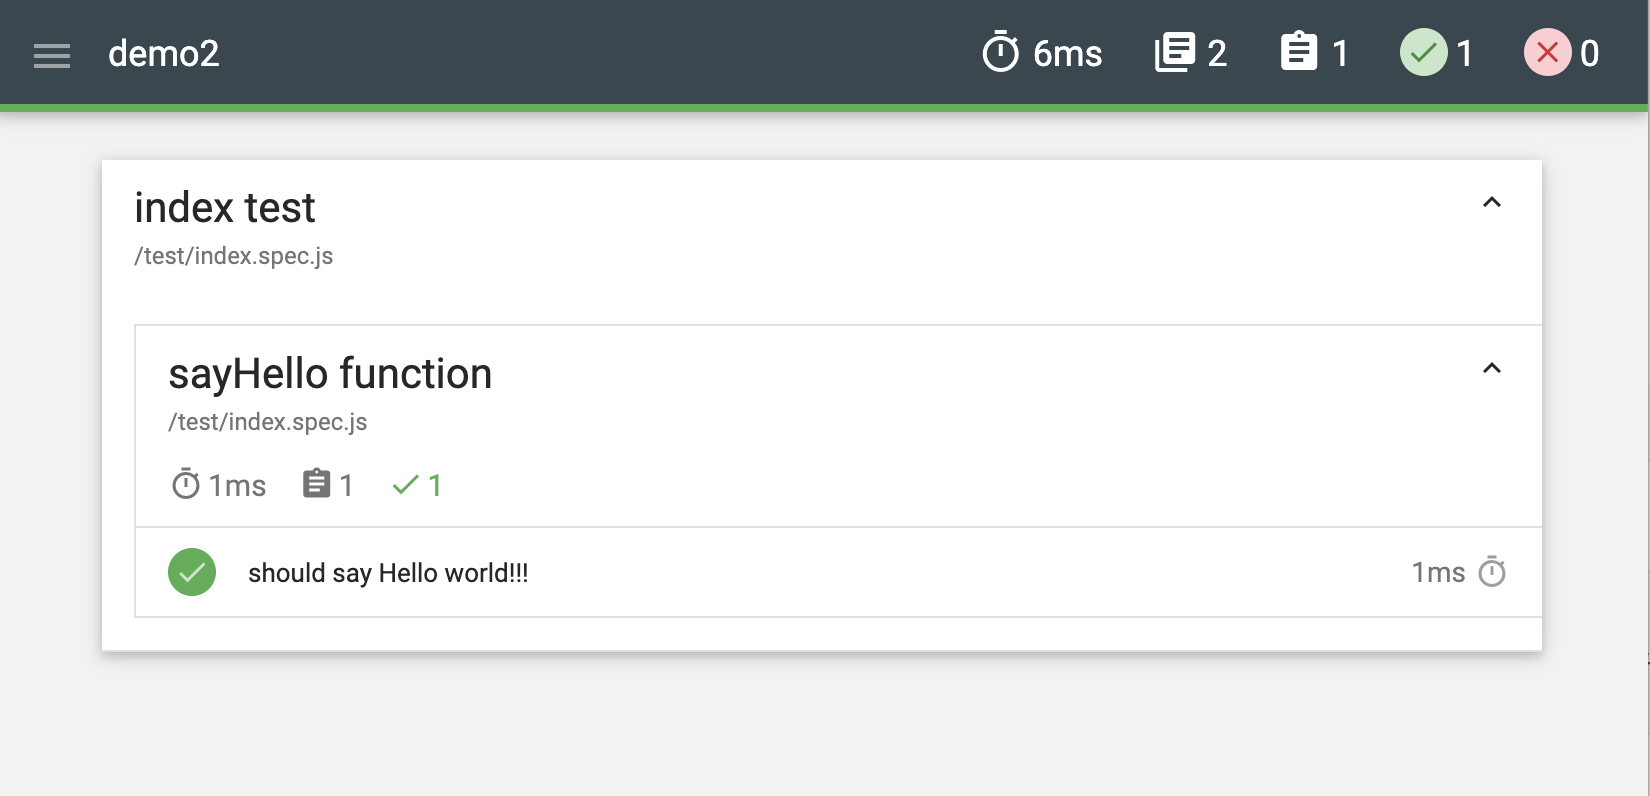
使用mochawesome展示你的测试结果:
npm install --save-dev mochawesome
然后在package.json的scripts中添加如下内容,
{
	"report": "mocha --require @babel/register --reporter mochawesome",
}
2
3
使用方式:
npm run report
形成出来的报告在浏览器中打开:
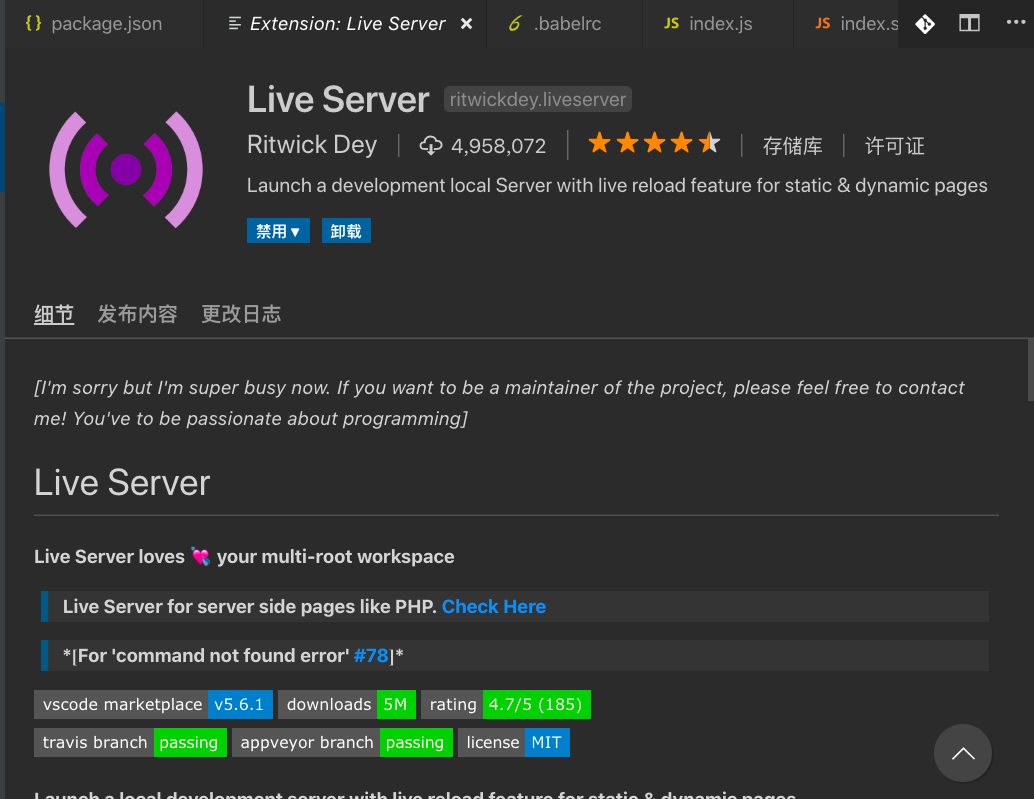
在Vscode中可以安装Live Server这个插件快速打开:
← 2.前端自动化测试 4.开箱即用Jest →