# 5.扩展知识
# 制作Docker镜像(重点)
Dockerfile 是一个由一堆命令+参数构成的脚本,使用 docker build 即可执行脚本构建镜像,自动的去做一些事,主要用于进行持续集成。
一般,Dockerfile 共包括四部分:
- 基础镜像信息
- 维护者信息
- 镜像操作指令
- 容器启动时执行指令
当Node.js遇见Docker,下面介绍Docker在前端中的应用:
一个简单的Koa应用:
const Koa = require('koa');
const app = new Koa();

// response
app.use(ctx => {
  ctx.body = 'Hello Koa!!';
});

app.listen(3000);
2
3
4
5
6
7
8
9
Dockerfile示例:
FROM node:10

LABEL maintainer=itheima@itcast.cn

# 创建 app 目录
WORKDIR /app

# 把 package.json,package-lock.json(npm@5+) 或 yarn.lock 复制到工作目录(相对路径)
COPY ["package.json","*.lock","./"]

# 打包 app 源码
# 特别注意:要指定工作目录中的文件名
COPY src ./src

# 使用.dockerignore文件,上面两个COPY合并成一个
# COPY . .

# 使用Yarn安装 app 依赖
# 如果你需要构建生产环境下的代码,请使用:
# --prod参数
RUN yarn --prod --registry=https://registry.npm.taobao.org

# 对外暴露端口 -p 4000:3000
EXPOSE 3000

CMD [ "node", "src/index.js" ]
2
3
4
5
6
7
8
9
10
11
12
13
14
15
16
17
18
19
20
21
22
23
24
25
26
使用docker build打包:
docker build -t ${your_name}/${image_name}:${tag} .
这里的your_name代表的是远程仓库中的用户名,或者仓库地址; image_name为镜像名称,tag是给镜像打的标签,用于版本控制。例如:
docker build -t itheima/node-demo:1.0 .
打包过程:
$ docker build -t itheima/node-demo:1.0 .
Sending build context to Docker daemon  17.92kB
Step 1/8 : FROM node:10
 ---> 5a401340b79f
Step 2/8 : LABEL maintainer=itheima@itcast.cn
 ---> Using cache
 ---> dd01419f30d5
Step 3/8 : WORKDIR /app
 ---> Using cache
 ---> bb9a44851ec9
Step 4/8 : COPY . .
 ---> Using cache
 ---> b08ff37c5456
Step 5/8 : RUN ls -la /app
 ---> Using cache
 ---> 4e0e57e807a1
Step 6/8 : RUN yarn --prod --registry=https://registry.npm.taobao.org
 ---> Using cache
 ---> 96ab842b4766
Step 7/8 : EXPOSE 3000
 ---> Using cache
 ---> 505dda4e680f
Step 8/8 : CMD [ "node", "src/index.js" ]
 ---> Using cache
 ---> f60e25a577de
Successfully built f60e25a577de
Successfully tagged itheima/node-demo:1.0
2
3
4
5
6
7
8
9
10
11
12
13
14
15
16
17
18
19
20
21
22
23
24
25
26
27
回顾前面的知识:
如何使用?
还记得docker run命令吗?
docker run -d --name nodedemo -p 3000:3000 itheima/node-demo:1.0
然后使用docker ps来看运行状态
$ docker run -d --name nodedemo -p 3000:3000 itheima/node-demo:1.0
c863da9afea1558593843233aec08989184d8dafbb0f8443830d1e523104ab00
$ docker ps
CONTAINER ID        IMAGE                   COMMAND               CREATED             STATUS              PORTS                    NAMES
c863da9afea1        itheima/node-demo:1.0   "node src/index.js"   2 seconds ago       Up 1 second         0.0.0.0:3000->3000/tcp   nodedemo
2
3
4
5
# Docker-compose介绍
通过 Docker-Compose 用户可以很容易地用一个配置文件定义一个多容器的应用,然后使用一条指令安装这个应用的所有依赖,完成构建。Docker-Compose 解决了容器与容器之间如何管理编排的问题。
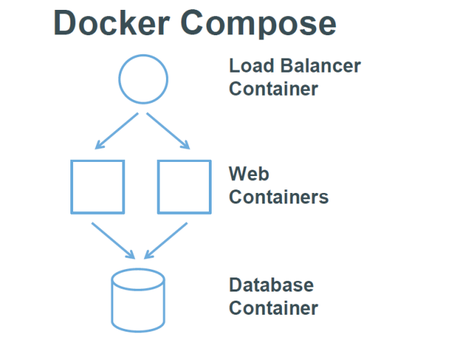
Compose 中有两个重要的概念:
- 服务 (service) :一个应用的容器,实际上可以包括若干运行相同镜像的容器实例。
- 项目 (project) :由一组关联的应用容器组成的一个完整业务单元,在 docker-compose.yml 文件中定义。
Docker Compose 是 Docker 的独立产品,因此需要安装 Docker 之后在单独安装 Docker Compose .
安装方法:
#下载
sudo curl -L https://github.com/docker/compose/releases/download/1.20.0/docker-compose-`uname -s`-`uname -m` -o /usr/local/bin/docker-compose
#安装
chmod +x /usr/local/bin/docker-compose
#查看版本
docker-compose --version
2
3
4
5
6
常见使用:
前面的例子,使用docker-compose改写:
version: '3'
services:
  mysql:
    image: mysql
    container_name: test-mysql
    ports:
    - "8000:3306"
    environment:
    - MYSQL_ROOT_PASSWORD=123456
2
3
4
5
6
7
8
9
在此文件的当前目录下,使用docker-compose up -d来执行。
生命周期管理:
创建:run/up
启动/停止/删除/重启:start/stop/rm/restart
检视/日志:logs/ps
看两个个复杂的应用:
搭建本地mongo + mongo-express服务
version: '3.1'
services:
  mongo:
    image: mongo
    restart: always
    environment:
      MONGO_INITDB_ROOT_USERNAME: root
      MONGO_INITDB_ROOT_PASSWORD: 123456

  mongo-express:
    image: mongo-express
    restart: always
    ports:
      - 8081:8081
    environment:
      ME_CONFIG_MONGODB_ADMINUSERNAME: root
      ME_CONFIG_MONGODB_ADMINPASSWORD: 123456
2
3
4
5
6
7
8
9
10
11
12
13
14
15
16
17
给公司搭建一个git服务器吧?!
项目地址: https://github.com/sameersbn/docker-gitlab
推荐服务器配置:适用于10人的小团队~~~~
2core
2GB+2GB(swap)
version: '2'

services:
  redis:
    restart: always
    image: sameersbn/redis:4.0.9-1
    command:
    - --loglevel warning
    volumes:
    - /srv/docker/gitlab/redis:/var/lib/redis:Z

  postgresql:
    restart: always
    image: sameersbn/postgresql:10
    volumes:
    - /srv/docker/gitlab/postgresql:/var/lib/postgresql:Z
    environment:
    - DB_USER=gitlab
    - DB_PASS=password
    - DB_NAME=gitlabhq_production
    - DB_EXTENSION=pg_trgm

  gitlab:
    restart: always
    image: sameersbn/gitlab:11.11.0
    depends_on:
    - redis
    - postgresql
    ports:
    - "10080:80"
    - "10022:22"
    volumes:
    - /srv/docker/gitlab/gitlab:/home/git/data:Z
    environment:
    - DEBUG=false

    - DB_ADAPTER=postgresql
    - DB_HOST=postgresql
    - DB_PORT=5432
    - DB_USER=gitlab
    - DB_PASS=password
    - DB_NAME=gitlabhq_production

    - REDIS_HOST=redis
    - REDIS_PORT=6379

    - TZ=Asia/Kolkata
    - GITLAB_TIMEZONE=Kolkata

    - GITLAB_HTTPS=false
    - SSL_SELF_SIGNED=false

    - GITLAB_HOST=localhost
    - GITLAB_PORT=10080
    - GITLAB_SSH_PORT=10022
    - GITLAB_RELATIVE_URL_ROOT=
    - GITLAB_SECRETS_DB_KEY_BASE=long-and-random-alphanumeric-string
    - GITLAB_SECRETS_SECRET_KEY_BASE=long-and-random-alphanumeric-string
    - GITLAB_SECRETS_OTP_KEY_BASE=long-and-random-alphanumeric-string

    - GITLAB_ROOT_PASSWORD=123456
    - GITLAB_ROOT_EMAIL=itheima@itcast.cn
...
2
3
4
5
6
7
8
9
10
11
12
13
14
15
16
17
18
19
20
21
22
23
24
25
26
27
28
29
30
31
32
33
34
35
36
37
38
39
40
41
42
43
44
45
46
47
48
49
50
51
52
53
54
55
56
57
58
59
60
61
62
63
docker-compose在前端里面的使用:
Nodejs + mongodb + koa + vue的应用组合:
特别注意:
视频中,我们使用vue是在局部安装的,所以使用npx命令在进行创建。
vue官网推荐大家进行全局安装:
npm i -g @vue/cli

# 然后使用
vue create myproject
2
3
4
docker-compose.yml
version: '3'
services:
  web:
    image: web:1.0
    ports:
    - "8080:80"

  server:
    image: server:1.0
    ports:
    - "3000:3000"
    depends_on:
    - mongodb
    links:
    - mongodb:db

  mongodb:
    image: mongo
    restart: always
    environment:
      MONGO_INITDB_ROOT_USERNAME: root
      MONGO_INITDB_ROOT_PASSWORD: 123456
2
3
4
5
6
7
8
9
10
11
12
13
14
15
16
17
18
19
20
21
22
depends_on 决定了容器加载的先后顺序,这里mongdb、web先加载,mongdb创建完成之后,再来创建server。
# 自学补充知识
- 什么是Kubernetes?
Kubernetes, 中文意思是舵手或导航员,它是一个容器集群管理系统,主要职责是容器编排(Container Orchestration)——启动容器,自动化部署、扩展和管理容器应用,还有回收容器。
文档: https://kubernetes.io/zh/
集群相关:Mesos (opens new window),Docker Swarm (opens new window)
- 简单的DevOps流程介绍:
参考链接:从一张图看Devops全流程 (opens new window)
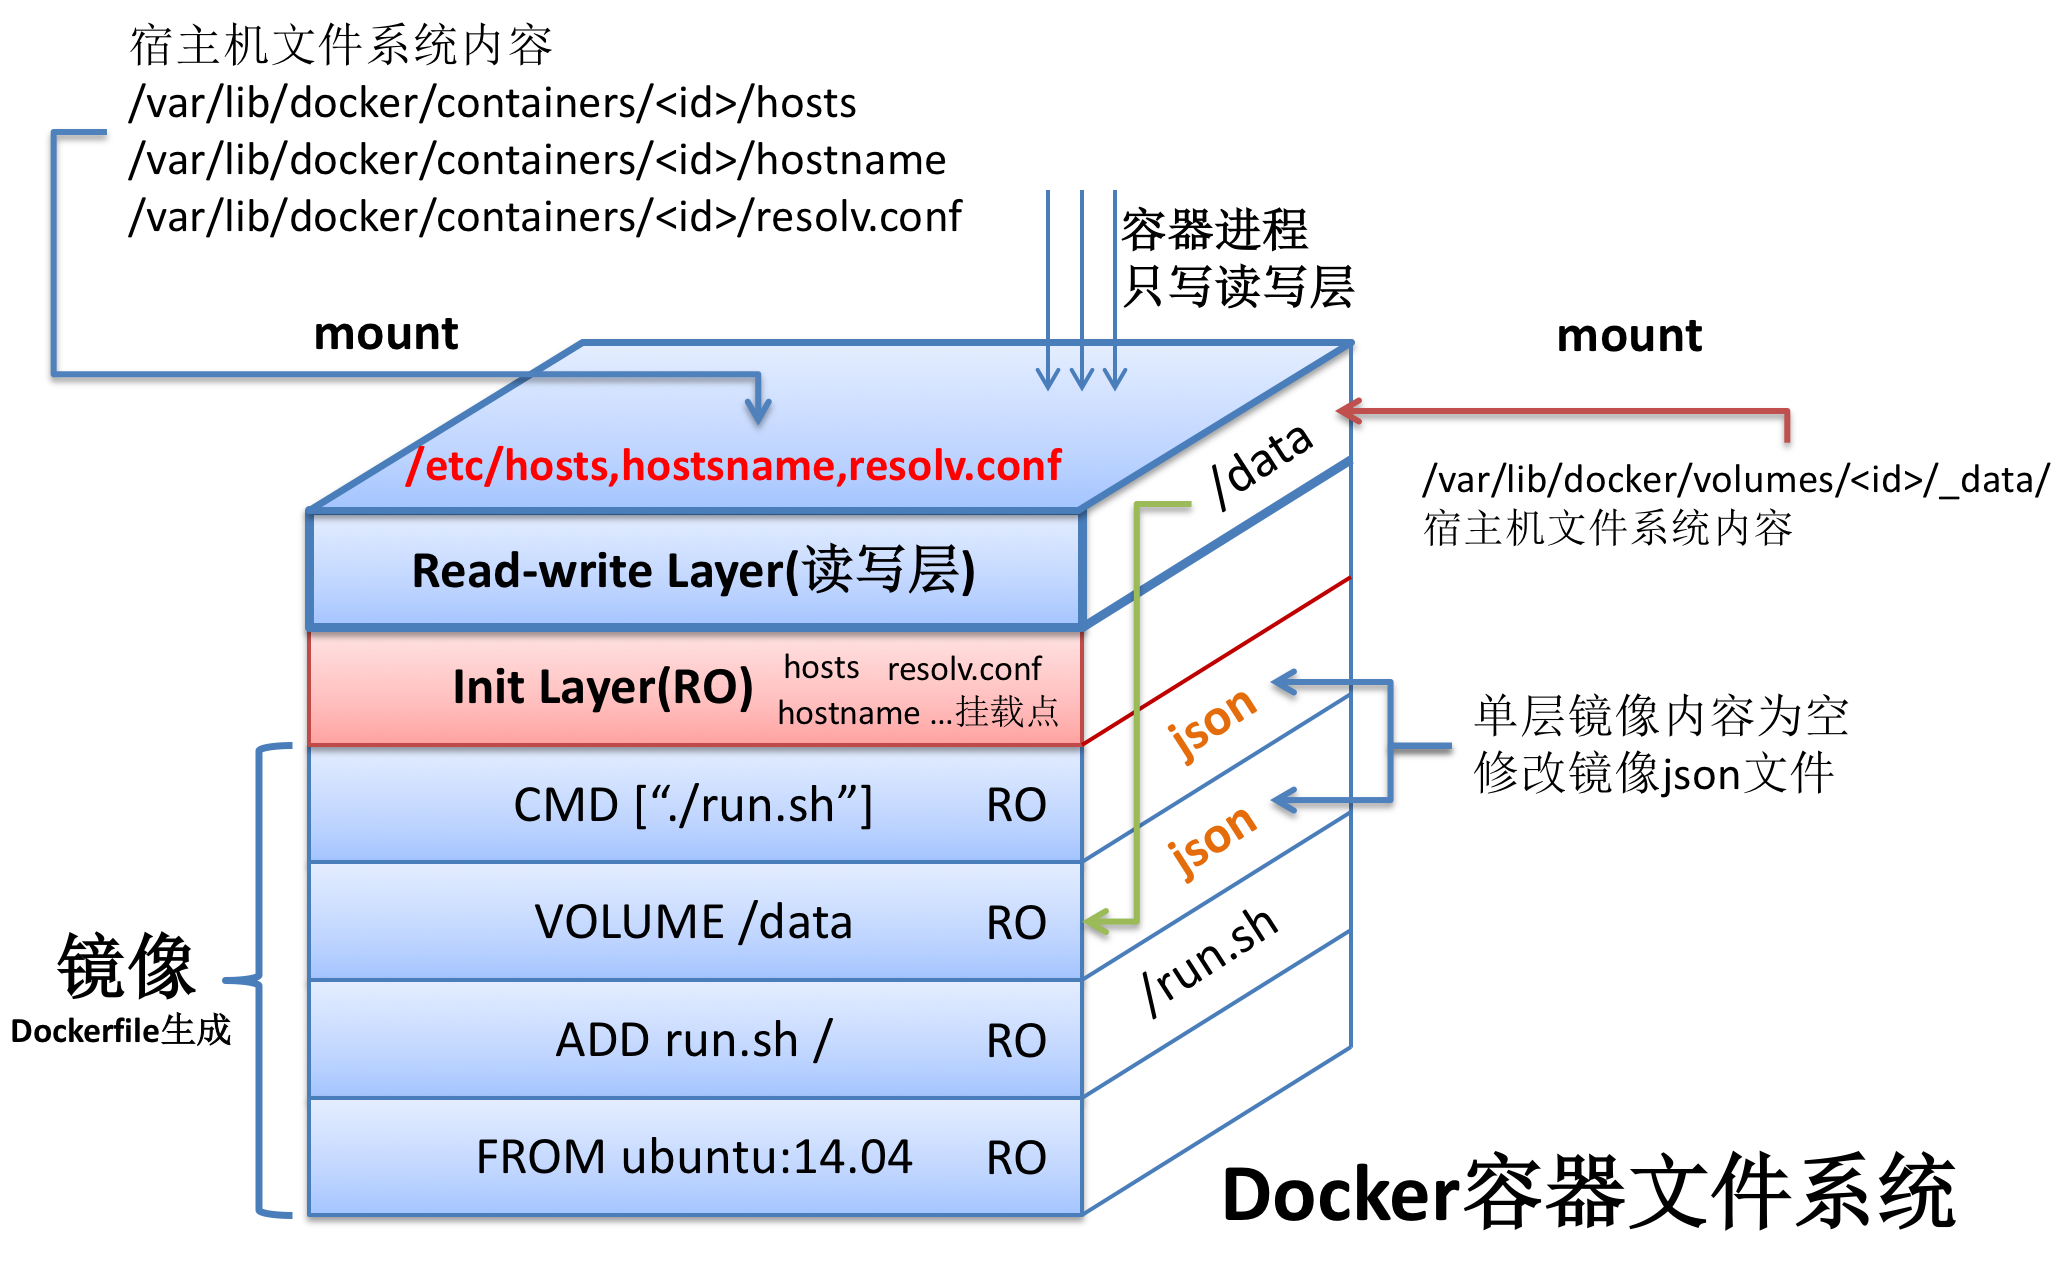
- Docker中的文件系统,深入理解原理:
Docker的一般开发流程介绍:
- 寻找基础镜像
- 基于基础镜像编写Dockerfile脚本
- 根据Dockerfile脚本创建项目镜像
- 将创建的镜像推送到docker仓库 (根据自身需要,可做可不做)
- 基于项目镜像创建并运行docker容器 (实现最终部署)
这里面如果一扩展,就变成了自动化开发流程,比如:加入版本控制git -> 使用webhook -> jenkins自动打包 -> docker自动构建 -> 推送镜像 -> 生产环境部署
← 4.使用Docker 6.Docker资源 →