# 第3章 webpack 高级配置
# HTML 中 img 标签的图片资源处理
安装
npm install -S html-withimg-loader在
webpack.config.js文件中添加 loader{ test: /\.(htm|html)$/i, loader: 'html-withimg-loader' }1
2
3
4使用时,只需要在 html 中正常引用图片即可,webpack 会找到对应的资源进行打包,并修改 html 中的引用路径
# 多页应用打包
在
webpack.config.js中修改入口和出口配置// 1. 修改为多入口 entry: { main: './src/main.js', other: './src/other.js' }, output: { path: path.join(__dirname, './dist/'), // filename: 'bundle.js', // 2. 多入口无法对应一个固定的出口, 所以修改filename为[name]变量 filename: '[name].js', publicPath: '/' }, plugins: [ // 3. 如果用了html插件,需要手动配置多入口对应的html文件,将指定其对应的输出文件 new HtmlWebpackPlugin({ template: './index.html', filename: 'index.html', chunks: ['main'] }), new HtmlWebpackPlugin({ template: './index.html', filename: 'other.html', // chunks: ['other', 'main'] chunks: ['other'] }) ]1
2
3
4
5
6
7
8
9
10
11
12
13
14
15
16
17
18
19
20
21
22
23
24
25
26修改入口为对象,支持多个 js 入口,同时修改 output 输出的文件名为
'[name].js'表示各自已入口文件名作为输出文件名,但是html-webpack-plugin不支持此功能,所以需要再拷贝一份插件,用于生成两个 html 页面,实现多页应用
# 第三方库的两种引入方式
可以通过expose-loader进行全局变量的注入,同时也可以使用内置插件webpack.ProvidePlugin对每个模块的闭包空间,注入一个变量,自动加载模块,而不必到处 import 或 require
expose-loader 将库引入到全局作用域
安装
expose-loadernpm i -D expose-loader配置 loader
module: {
  rules: [
    {
      test: require.resolve("jquery"),
      use: {
        loader: "expose-loader",
        options: "$",
      },
    },
  ];
}
1
2
3
4
5
6
7
8
9
10
11tips:
require.resolve用来获取模块的绝对路径。所以这里的 loader 只会作用于 jquery 模块。并且只在 bundle 中使用到它时,才进行处理。
webpack.ProvidePlugin 将库自动加载到每个模块
引入 webpack
const webpack = require("webpack");1创建插件对象
要自动加载
jquery,我们可以将两个变量都指向对应的 node 模块new webpack.ProvidePlugin({ $: "jquery", jQuery: "jquery", });1
2
3
4
# Development / Production 不同配置文件打包
项目开发时一般需要使用两套配置文件,用于开发阶段打包(不压缩代码,不优化代码,增加效率)和上线阶段打包(压缩代码,优化代码,打包后直接上线使用)
抽取三个配置文件:
webpack.base.js
webpack.prod.js
webpack.dev.js
步骤如下:
将开发环境和生产环境公用的配置放入 base 中,不同的配置各自放入 prod 或 dev 文件中(例如:mode)
然后在 dev 和 prod 中使用
webpack-merge把自己的配置与 base 的配置进行合并后导出npm i -D webpack-merge将 package.json 中的脚本参数进行修改,通过
--config手动指定特定的配置文件
# 配置文件详情
# webpack.base.js
const path = require("path");
const HtmlWebpackPlugin = require("html-webpack-plugin");
const CleanWebpackPlugin = require("clean-webpack-plugin");
const CopyWebpackPlugin = require("copy-webpack-plugin");
const webpack = require("webpack");

// webpack的配置文件遵循着CommonJS规范
module.exports = {
  // entry: './src/main.js',
  entry: {
    index: "./src/index.js",
    other: "./src/other.js",
  },
  output: {
    // path.resolve() : 解析当前相对路径的绝对路径
    // path: path.resolve('./dist/'),
    // path: path.resolve(__dirname, './dist/'),
    path: path.join(__dirname, "..", "./dist/"),
    // filename: 'bundle.js',
    filename: "[name].js",
    publicPath: "/",
  },
  // 开启监视模式, 此时执行webpack指令进行打包会监视文件变化自动打包
  // watch: true
  plugins: [
    new HtmlWebpackPlugin({
      filename: "index.html",
      template: "./src/index.html",
      chunks: ["index", "other"],
    }),
    new HtmlWebpackPlugin({
      filename: "other.html",
      template: "./src/other.html",
      chunks: ["other"],
    }),
    new CleanWebpackPlugin(),
    new CopyWebpackPlugin([
      {
        from: path.join(__dirname, "..", "assets"),
        to: "assets",
      },
    ]),
    new webpack.BannerPlugin("黑马程序员真牛biubiu!"),
    new webpack.ProvidePlugin({
      $: "jquery",
      jQuery: "jquery",
    }),
  ],
  module: {
    rules: [
      {
        test: /\.css$/,
        // webpack读取loader时 是从右到左的读取, 会将css文件先交给最右侧的loader来处理
        // loader的执行顺序是从右到左以管道的方式链式调用
        // css-loader: 解析css文件
        // style-loader: 将解析出来的结果 放到html中, 使其生效
        use: ["style-loader", "css-loader"],
      },
      { test: /\.less$/, use: ["style-loader", "css-loader", "less-loader"] },
      {
        test: /\.s(a|c)ss$/,
        use: ["style-loader", "css-loader", "sass-loader"],
      },
      {
        test: /\.(jpg|jpeg|png|bmp|gif)$/,
        use: {
          loader: "url-loader",
          options: {
            limit: 5 * 1024,
            outputPath: "images",
            name: "[name]-[hash:6].[ext]",
          },
        },
      },
      { test: /\.(woff|woff2|eot|svg|ttf)$/, use: "url-loader" },
      {
        test: /\.js$/,
        use: {
          loader: "babel-loader",
          // options: {
          //   presets: ['@babel/env'],
          //   plugins: [
          //     '@babel/plugin-proposal-class-properties',
          //     '@babel/plugin-transform-runtime'
          //   ]
          // }
        },
        exclude: /node_modules/,
      },
      {
        test: /\.(htm|html)$/i,
        loader: "html-withimg-loader",
      },
      // {
      //   // 用于解析jQuery模块的绝对路径
      //   test: require.resolve('jquery'),
      //   use: {
      //     loader: 'expose-loader',
      //     options: '$'
      //   }
      // }
    ],
  },
};
2
3
4
5
6
7
8
9
10
11
12
13
14
15
16
17
18
19
20
21
22
23
24
25
26
27
28
29
30
31
32
33
34
35
36
37
38
39
40
41
42
43
44
45
46
47
48
49
50
51
52
53
54
55
56
57
58
59
60
61
62
63
64
65
66
67
68
69
70
71
72
73
74
75
76
77
78
79
80
81
82
83
84
85
86
87
88
89
90
91
92
93
94
95
96
97
98
99
100
101
102
103
104
# webpack.prod.js
const merge = require("webpack-merge");
const baseConfig = require("./webpack.base.js");
const webpack = require("webpack");

// webpack的配置文件遵循着CommonJS规范
module.exports = merge(baseConfig, {
  mode: "production",
  devtool: "cheap-module-source-map",
  plugins: [
    new webpack.DefinePlugin({
      IS_DEV: "false",
      // test: '1 + 1', // DefinePlugin会解析定义的环境变量表达式, 当成JS执行
      // test2: '"zs"'
    }),
  ],
});
2
3
4
5
6
7
8
9
10
11
12
13
14
15
16
# webpack.dev.js
const merge = require("webpack-merge");
const baseConfig = require("./webpack.base.js");
// 引入webpack
const webpack = require("webpack");
// webpack的配置文件遵循着CommonJS规范
module.exports = merge(baseConfig, {
  mode: "development",
  // 开启监视模式, 此时执行webpack指令进行打包会监视文件变化自动打包
  // watch: true
  devServer: {
    open: true,
    hot: true, // 开启热更新
    compress: true,
    port: 3000,
    // contentBase: './src'
    proxy: {
      // /api/getUserInfo
      // 当前端请求 /api 地址时, 会将请求转发到
      // http://localhost:9999/api
      // 举例: 客户端现在请求的时 /api/getUserInfo
      // 此时会将请求转发到: http://localhost:9999/api/getUserInfo
      // '/api': 'http://localhost:9999',
      // 此时会将请求转发到: http://localhost:9999/getUserInfo
      // '/getUserInfo': 'http://localhost:9999'
      "/api": {
        target: "http://localhost:9999",
        // 转发请求时不会携带 /api
        // http://localhost:9999/getUserInfo
        pathRewrite: {
          "^/api": "",
        },
      },
    },
  },
  devtool: "cheap-module-eval-source-map",
  plugins: [
    new webpack.DefinePlugin({
      IS_DEV: "true",
      // test: '1 + 1', // DefinePlugin会解析定义的环境变量表达式, 当成JS执行
      // test2: '"zs"'
    }),
  ],
});
2
3
4
5
6
7
8
9
10
11
12
13
14
15
16
17
18
19
20
21
22
23
24
25
26
27
28
29
30
31
32
33
34
35
36
37
38
39
40
41
42
43
# 定义环境变量
除了区分不同的配置文件进行打包,还需要在开发时知道当前的环境是开发阶段或上线阶段,所以可以借助内置插件DefinePlugin来定义环境变量。最终可以实现开发阶段与上线阶段的 api 地址自动切换。
引入 webpack
const webpack = require("webpack");1创建插件对象,并定义环境变量
- 开发环境
IS_DEV为true - 生产环境
IS_DEV为false
module.exports = merge(baseConfig, {
  mode: "development",
 ....
  plugins: [
    new webpack.DefinePlugin({
      IS_DEV: "true",
      // test: '1 + 1', // DefinePlugin会解析定义的环境变量表达式, 当成JS执行 结果为2
      // test2: '"xc"'  // 注意, 如果需要定义字符串变量,需要套单引号套双引号 或者 双引号套单引号
    }),
  ],
});
1
2
3
4
5
6
7
8
9
10
11- 开发环境
在开发或者打包环境下可以直接使用
- 如果使用
npm run dev, 会启用webpack.dev.js文件,IS_DEV为 true - 如果使用
npm run build, 会启用webpack.prod.js文件,IS_DEV为 false, 启用 live-server, 运行即可
- api地址切换
// 开发环境地址
let host = 'http://192.168.1.22:9999'
if (!IS_DEV) {
  // 如果不是开发环境, 会启用正式地址
  host = 'http://www.xcooo.cn'
}

let url = host + '/api/v1/getUserInfo'

import axios from 'axios'

export const getUserInfo = () => axios.get(url)
2
3
4
5
6
7
8
9
10
11
12
# 使用 devServer 解决跨域问题
在开发阶段很多时候需要使用到跨域,何为跨域?请看下图:
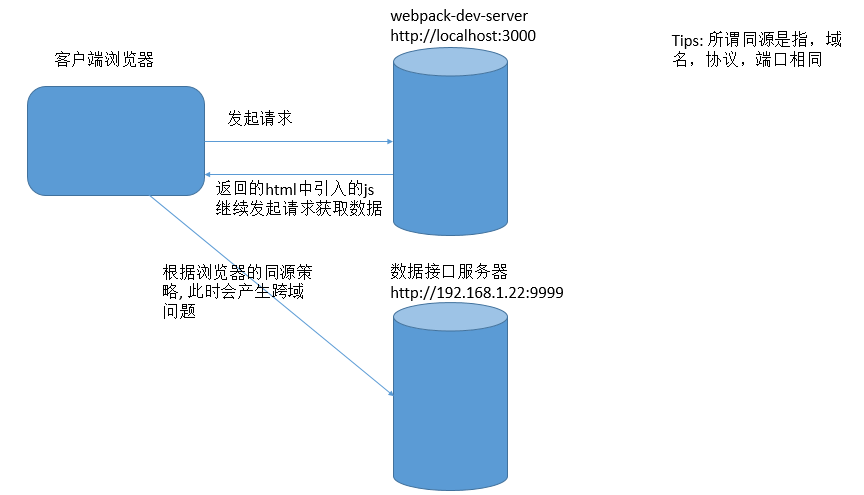
开发阶段往往会遇到上面这种情况,也许将来上线后,前端项目会和后端项目部署在同一个服务器下,并不会有跨域问题,但是由于开发时会用到 webpack-dev-server,所以一定会产生跨域的问题
目前解决跨域主要的方案有:
- jsonp(淘汰)
- cors
- http proxy
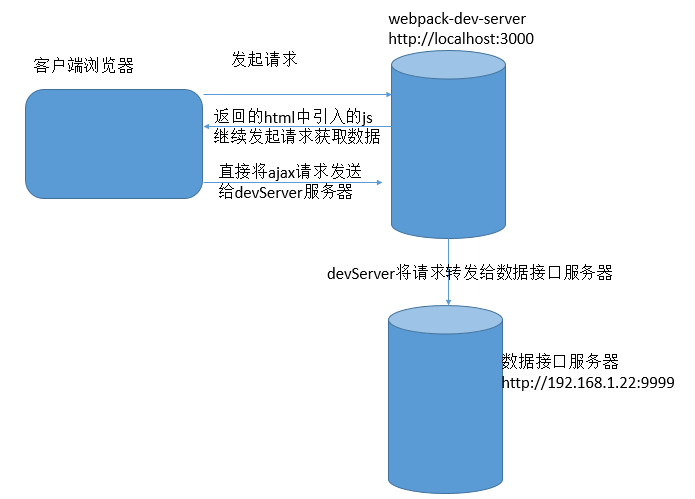
此处介绍的使用 devServer 解决跨域,其实原理就是 http proxy
将所有 ajax 请求发送给 devServer 服务器,再由 devServer 服务器做一次转发,发送给数据接口服务器
由于 ajax 请求是发送给 devServer 服务器的,所以不存在跨域,而 devServer 由于是用 node 平台发送的 http 请求,自然也不涉及到跨域问题,可以完美解决!
服务器代码(返回一段字符串即可):
const express = require("express");
const app = express();
// const cors = require('cors')
// app.use(cors())
app.get("/api/getUserInfo", (req, res) => {
  res.send({
    name: "星城哈哈",
    age: 13,
  });
});

app.listen(9999, () => {
  console.log("http://localhost:9999!");
});
2
3
4
5
6
7
8
9
10
11
12
13
14
前端需要配置 devServer 的 proxy 功能,在webpack.dev.js中进行配置:
  devServer: {
    open: true,
    hot: true, // 开启热更新
    compress: true,
    port: 3000,
    // contentBase: './src'
    proxy: {
      // /api/getUserInfo
      // 当前端请求 /api 地址时, 会将请求转发到
      // http://localhost:9999/api
      // 举例: 客户端现在请求的时 /api/getUserInfo
      // 此时会将请求转发到: http://localhost:9999/api/getUserInfo
      // '/api': 'http://localhost:9999',
      // 此时会将请求转发到: http://localhost:9999/getUserInfo
      // '/getUserInfo': 'http://localhost:9999'
      '/api': {
        target: 'http://localhost:9999',
        // 转发请求时不会携带 /api
        // http://localhost:9999/getUserInfo
        pathRewrite: {
          '^/api': ''
        }
      }
    }
  },
2
3
4
5
6
7
8
9
10
11
12
13
14
15
16
17
18
19
20
21
22
23
24
25
意为前端请求/api的 url 时,webpack-dev-server 会将请求转发给http://localhost:9999/api处,此时如果请求地址为http://localhost:9999/api/getUserInfo,只需要直接写/api/getUserInfo即可,代码如下:
axios.get("/api/getUserInfo").then((result) => console.log(result));
# HMR 的使用
需要对某个模块进行热更新时,可以通过module.hot.accept方法进行文件监视
只要模块内容发生变化,就会触发回调函数,从而可以重新读取模块内容,做对应的操作
if (module.hot) {
  module.hot.accept('./hotmodule.js', function () {
    // 当hotmodule模块内容更新时触发
    // console.log('hotmodule被更新了!')
    // import / export语法必须在顶级作用域中使用,无法在子级作用域中使用
    // import str from './hotmodule'
    var hotmodule = require('./hotmodule.js')
    console.log(hotmodule)
  })
}
2
3
4
5
6
7
8
9
10
- 注意: HMR不适用生产环境, 只用于开发环境